

How to use an SVG with WordPress & CSS

SVG (Scalable Vector Graphics) are now very popular on the web for logos and icons, as they are much more flexible than traditional image formats. They are not limited by size or resolution and can resize and adapt to a mobile friendly environment and have better quality in the process.
They sound perfect, so you would expect to be able to drop any SVG in your Media library and place them easily inside a page or post of your WordPress site, just like any other image formats (jpg, png). Well, of course it is not so easy, and for good reasons. So why are they difficult to use on your website?
What’s an SVG?
More common types of images such as JPG or PNG are called raster images. Those are made of defined pixels which make the image altogether. They are set in size and resolution, and cannot change much as you use them, apart from scaling up and down, none of their components are dynamically flexible.
Although an SVG looks like any other image, they are fundamentally different from JPG and PNG. They are files made up of code, with information such as coordinates of points, colour codes, etc… It is a vector in the pure mathematical sense. A vector line is a line connecting 2 points, and if the distance changes the line changes as easily using the same logic.
Security issue
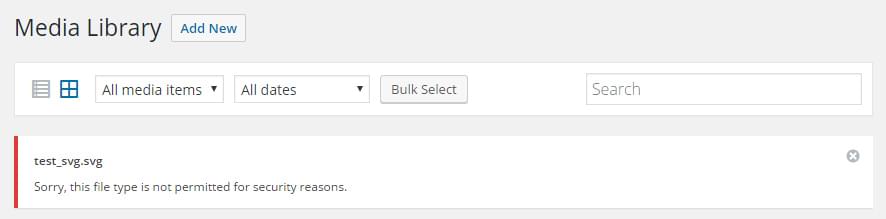
Because SVG are code files, they represent a security threat to your website. Malicious codes can reside in them whereas JPG or PNG are generally considered safe. It is for this reason that WordPress and many other Content Management Systems (CMS) do not allow them natively. It just requires adjustments before you can take advantage of them, which I guess limits the security risks from affecting more informed users.
WordPress requirements
Before we see the different ways you can use an SVG in your WordPress, we must enable their use first. There are several methods to achieve the same result. For simplicity, I will use the Plugin method as it is the simplest one.
- SVG Support by Benbodhi
- Safe SVG by Darill Doyle
I will use Safe SVG for my website, but they all work essentially the same way. Once you have the plugin installed and activated, you will be able to drop SVG files in your media library and see them in action without receiving any errors or security alerts from WordPress.
Note: If you don’t want to use a plugin, there is a way to insert code to your function.php file. I let you find out about it, as I haven’t tested it. Some discussion about it in this article.
Uploading an SVG file
By uploading an SVG directly in your media library, you will be able to enjoy its benefits (scalable, responsive, light file) but will not be able to change any parts using CSS. In other words if you upload a black SVG icon, you will not be able to make it red without uploading a new dedicated red version. So the editing would need to be done in your graphic software rather than via code. (Adobe Illustrator or Vectr)
This is perfect for Website logos, simple icons on your posts or pages or anything that you know will not need to be modified much after.

Inline SVG
If you want the freedom to modify your SVG with codes, or plan to animate it, you will need to use what is called an “inline SVG”. The code of the file itself will be included in your page, and not as an isolated file embedded on the page.
Inline SVG are compatible with Page Builders in WordPress. You will just need to use a Code Block instead of an Image Block. These allow you to paste the SVG code directly as opposed to loading the final image.
Complex SVG
It is important to note that if you plan to change elements of your SVG or even animate them, you will need to compose your graphic with separated elements using different layers. Direct customisation through CSS code cannot work if your SVG is a single connected shape.
We will see below how to prepare your file using Adobe Illustrator, and export it the right way to modify it using CSS on your WordPress.
Creating a complex SVG
For this example I use Adobe Illustrator, but any vector drawing software can work. I like to create my icons in a 100 by 100 pixels canvas, RGB colour spectrum. So start by setting up your document this way.
- New document 100px x 100px.
- 5px margin is good practice, but not necessary as we will export the final shape only.
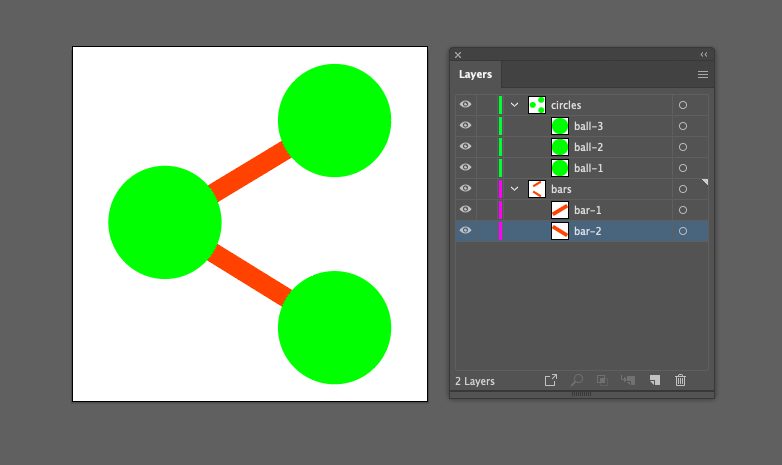
- With your tools, create the sapes you want as separate elements.
- Give each element its own layer.
- Name your layers with web friendly name such as “top-circle”.
Exporting your complex SVG
Because your SVG is made of separate elements, it is not possible to use the “Asset Export” panel in Illustrator. That would export each elements as SVG, which is not what we want. Grouping the elements would solve this, but you would lose the benefit of naming your separate layers, which will become handy for CSS edits later.
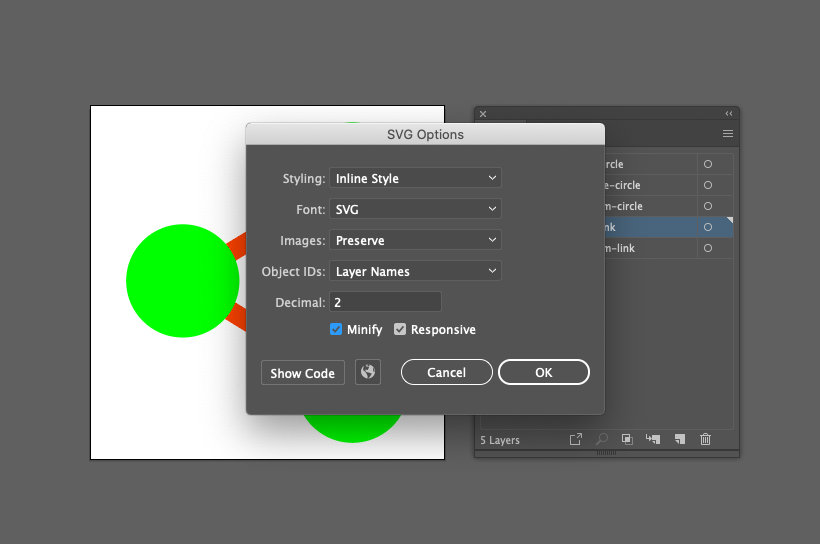
So best is to use the “Export as” option in the main menu > File > Export as…
- Export as…
- Choose SVG as file format and give it a we friendly name, so no empty space, and all lowercase.
- In the next dialog box, choose “inline style”.
- Object id’s “as layers name”.
- Tick “Minify” and “Responsive, for the code to be as simple as it can be.
- “Show Code” if you want to check the resulting code (optional).
- Ok to save your SVG file with these options.
Note: if you want a simple SVG icon, then you don’t need to separate elements by layers. All you need to do is to prepare your file as a shape in a single layer, and export it the same way. Your SVG will only have 1 id as the one layer. Which would still allow you to target it in CSS later on.
Adding your complex SVG to your WordPress
Once your file is ready, you can bring it into your post or page.
Using your Page Builder, you will choose the “RAW HTML” block so your SVG is inline with the code of your page or post. For this example, I am using WPBakery Page Builder on my WordPress site.
- Choose “Raw HTML” block
- Open your SVG file in a Code Editor (such as “Sublime Text”).
- If you don’t have a code editor, simply open the file in “Text edit” on a Mac or “WordText” on a PC.
- Copy the entire code.
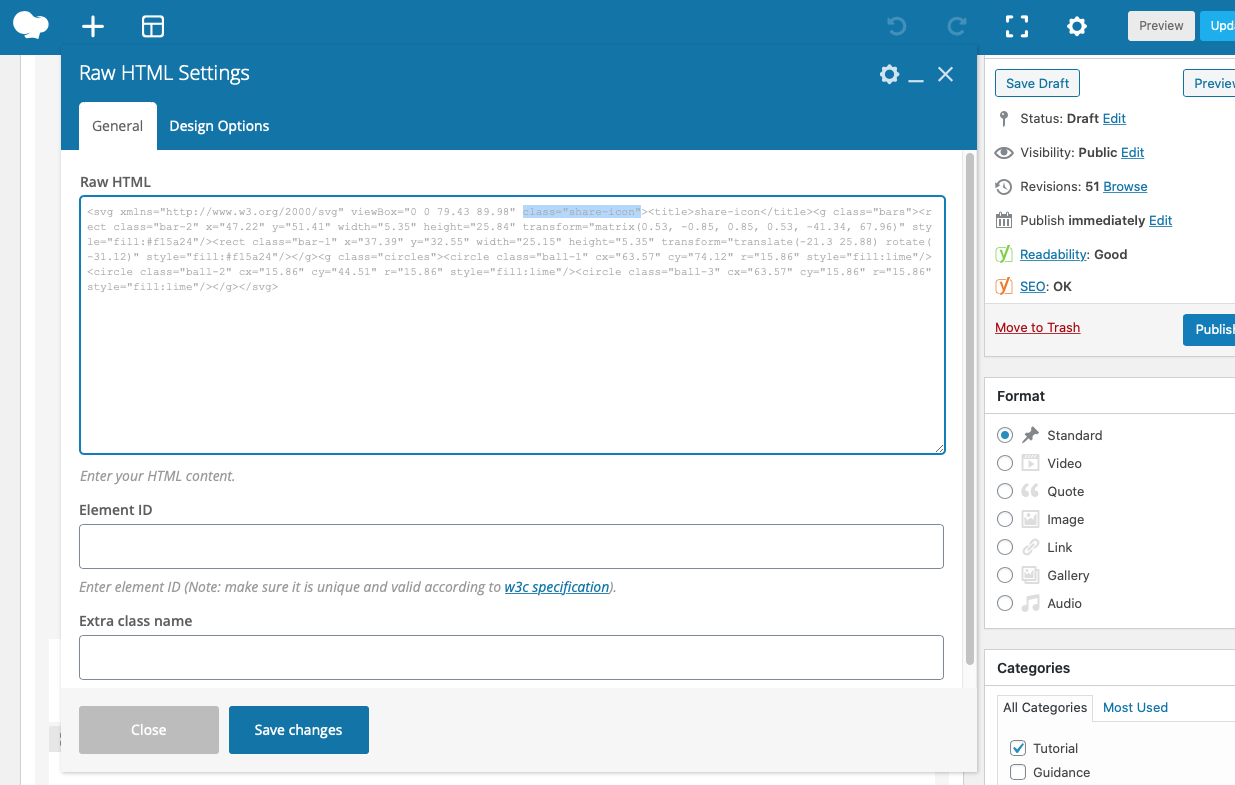
- Paste the code in the “Raw HTML” block, and save.
- Save your post or page to commit changes.
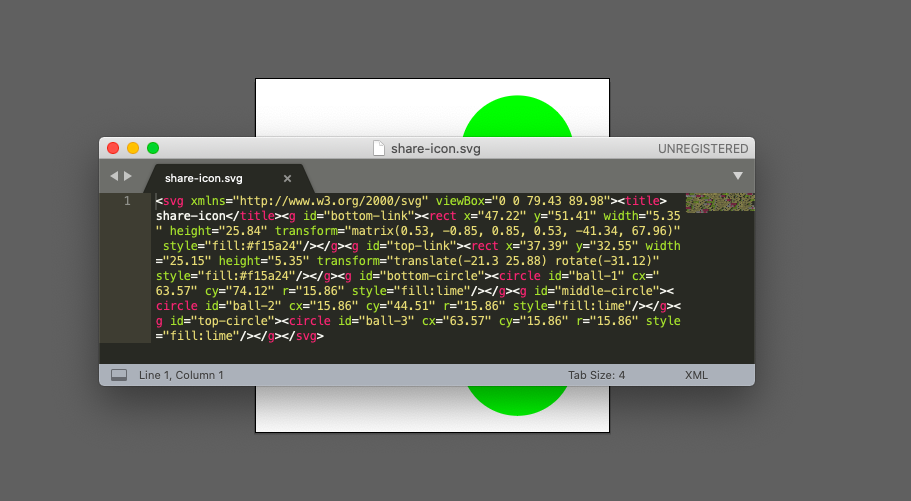
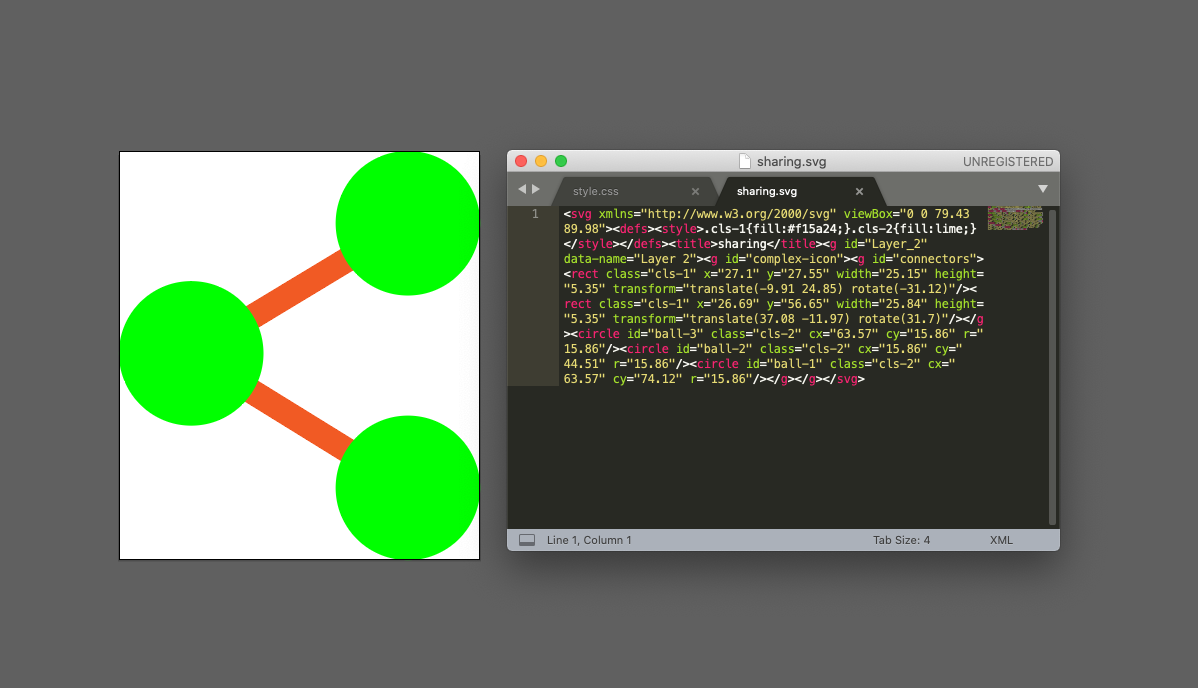
In order to target your SVG correctly using CSS, it is best to modify the code slightly to give it a class name. By default Adobe Illustrator doesn’t do this for you, so you will have to add the following to your code:
- Add “class=icon-name” at the beginning of the code just after the other attributes in the opening “<svg>”.
- In my case I’ll add “class=”share-icon”.
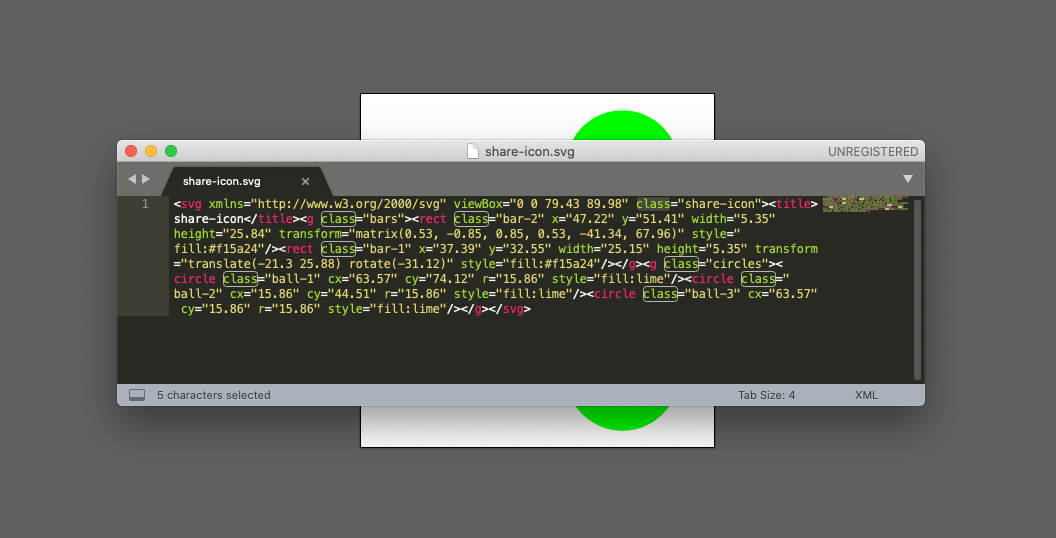
- I like to replace all the id’s to class for better use of the code in CSS.
- See my example below, where I give it the class name “share-icon” and replacing all id’s to classes.
- Best is to do it inside your SVG code as save it. Then paste the new code into the HTML block.
Editing your complex SVG with CSS
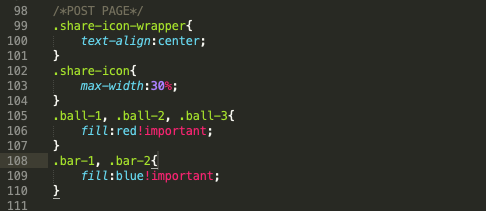
By default your SVG will be taking the entire space of the elements it is sitting in. So if it is the entire width of your post, it will be huge and fill the whole page. That is definitely too big, but not to worry, we can use CSS to change that.
- In your CSS stylesheet, add the class of your icon, for example “.share-icon”.
- Then give it a “max-width” of 30% for example, that will limit it’s size respective of the area it is in.

Now I can change the colour of each element if I want to. Let’s make the circles red and the bars blue.
- I target the classes of the circles, in my case “.ball-1”; “.ball-2”; “.ball-3” {fill:red!important;}.
- I target the classes of the bars, in my case “.bar-1″;”.bar-2″ { fill:blue!important;}.
- I also give my Raw HTML block an id “.share-icon-wrapper” so I can centre the icon relative to the page.
Note: It is also possible to change the colour of each element directly in the code pasted in the RAW HTML block. It depends if you prefer to make edits in CSS or more within the Page Builder.
Bottom line, there are different ways to use SVG in your WordPress. If you want maximum of control later, best is to paste the code of the SVG in your page using an HTML block. This way you can edit your SVG quickly with your CSS stylesheet. It saves you the trouble of creating multiple files and ultimately saves you time and storage space down the line.
Adobe Illustrator does a good job at exporting the SVG into clean code, however it still requires some customisation to use the code correctly in CSS. For this reason, this will only be interesting to people looking to animate their icons or automate their styling through code.
Feel free to contact me to discuss your project if you feel you need a freelance graphic designer to help you achieve your goal. I am a freelance graphic designer in Hong Kong, building quality branding across media, from print to digital.
Read more on this topic:
Work with SVG format in Illustrator by Adobe
How to use and SVG as a logo in WordPress by Aspen Grove Studio
The perfect WordPress inline SVG workflow by TreeHouse
CSS Styling Illustrator SVG by Coding with Spike